Remote Code Signing
This project has support for remote signing. This is a feature where cryptographic signature operations (requiring access to the private key) are delegated to a remote machine.
From a high level, two machines establish a secure communications bridge with each other through a central server. The initiating machine starts signing operations like normal. But when it gets to an operation that requires producing a cryptographic signature, it sends an end-to-end encrypted message to the bound signer peer with the message to sign. The signer then uses its private key to create a signature, which it sends back to the initiator, who incorporates it into the code signature.
Remote signing is essentially peer-to-peer, not client-server. The central server exists for relaying encrypted messages between peers and not for performing signing operations itself. Each signing session is ephemeral and short-lived. Since the signing keys are offline by default and a human must take action to join a signing session and use the signing keys, remote signing is theoretically more secure than solutions like giving a (CI) machine unlimited access to a code signing certificate or HSM.
Remote signing is intended for use cases where the machine initiating signing must not or can not have access to the private key material or unlimited access to it. Popular scenarios include:
CI environments where you don’t want a CI worker to have unlimited access to the signing key because CI workers are notoriously difficult to secure. (If someone can run arbitrary jobs on your CI they can likely exfiltrate any CI secrets with ease.)
When hardware security devices are used and machines initiating the signing don’t have direct access to this device. Think a remote CI machine or coworker wanting to sign with a certificate in a YubiKey or HSM whose access is entrusted to a specific person (or group of people in the case of an HSM).
Important
This feature is considered alpha and will likely change in future versions.
Danger
The custom cryptosystem for remote signing has not yet undergone an audit. The end-to-end message encryption and tampering resistance claims we’ve made may be undermined by weaknesses in the design of the cryptosystem and its implementation and interaction in code.
In other words, use this feature at your own risk.
Issue 5 tracks performing an audit of this feature.
How It Works
A full overview of the protocol and cryptography involved is available at Remote Code Signing Protocol and you can read more about the design and security at Remote Code Signing Design and Security Considerations.
From a high-level, signing operations involve 2 parties:
The initiator of the signing request. This is the entity that wants something to be signed but doesn’t having the signing certificate / key.
The signer. This is the entity who has access to the private signing key.
The signing procedure is essentially:
Initiator opens a persistent websocket to a central server and publishes details about that session and how to connect to it.
Signer follows the instructions from initiator and joins the signing session by opening a websocket to the same server as the initiator. Cryptography is employed to derive encryption keys so all subsequently exchanged messages are end-to-end encrypted, preventing the server or any privileged network actors from eavesdropping on signing operations or forging a signing request.
Initiator sends a request to signer asking them to sign a message.
Signer inspects the request and issues a cryptographic signature, which it sends back to initiator.
Steps 3-4 are repeated as long as necessary.
Using
The initiator begins a remote signing session via rcodesign sign
--remote-signer. (Some additional arguments are required - see below.)
This command will print out an rcodesign command that the signer must
subsequently run to join the signing session. e.g.:
$ rcodesign sign --remote-signer --remote-shared-secret-env SHARED_SECRET
...
connecting to wss://ws.codesign.gregoryszorc.com/
session successfully created on server
Run the following command to join this signing session:
rcodesign remote-sign gm1zaGFyZWRzZWNyZXQwg...
(waiting for remote signer to join)
At this point, that long opaque string - which we call a session join string - needs to be copied or entered on the signer. e.g.:
$ rcodesign remote-sign --p12-file developer_id.p12 --remote-shared-secret-env SHARED_SECRET \
gm1zaGFyZWRzZWNyZXQwg...
If everything goes according to plan, the 2 processes will communicate with each other and initiator will delegate all of its signing operations to signer, who will issue cryptographic signatures which it sends back to the initiator.
Session Agreement
Remote signing currently requires that the initiator and signer exchange and agree about something before signing operations. This ahead-of-time exchange improves the security of signing operations by helping to prevent signers from creating unwanted signatures.
The sections below detail the different types of agreement and how they are used.
Public Key Agreement
Important
This is the most secure and preferred method to use.
In this operating mode, the signer possesses a private key that can decrypt messages. When the initiator begins a signing operation, it encrypts a message that only the signer’s private key can decrypt. This encrypted message is encapsulated in the session join string exchanged between the initiator and signer.
This mode can be activated by passing one of the following arguments defining the public key:
--remote-public-keyAccepts base64 encoded public key data.
Specifically, the value is the DER encoded SubjectPublicKeyInfo (SPKI) data structure defined by RFC 5280.
--remote-public-key-pem-fileThe path to a file containing the PEM encoded public key data.
The file can begin with
-----BEGIN PUBLIC KEY-----or-----BEGIN CERTIFICATE-----. The former defines just the SPKI data structure. The latter an X.509 certificate (which has the SPKI data inside of it).
Both the public key and certificate data can be obtained by running the
rcodesign analyze-certificate command against a (code signing) certificate.
The signer needs to use the corresponding private key specified by the
initiator in order to join the signing session. By default, rcodesign
remote-sign attempts to use the in-use code signing certificate for
decryption.
So, an end-to-end workflow might look like the following:
Run
rcodesign analyze-certificateand locate the-----BEGIN PUBLIC KEY-----block.Save this to a file,
signing_public_key.pem. You can check this file into source control - the contents aren’t secret.On the initiator, run
rcodesign sign --remote-signer --remote-public-key-pem-file signing_public_key.pem /path/to/input /path/to/output.On the signer, run
rcodesign remote-sign --smartcard-slot 9c ``<session join string>.
We believe this method to be the most secure for establishing sessions because:
The state required to bootstrap the secure session is encrypted and can only be decrypted by the private key it is encrypted for. If you are practicing proper key management, there is exactly 1 copy of the private key and access to the private key is limited. This means you need access to the private key in order to compromise the security of the signing session.
The session ID is encrypted and can’t be discovered if the session join string is observed. This eliminates a denial of service vector.
Using with GitHub Actions
It is pretty simple to initiate remote code signing from GitHub Actions! In fact, this scenario is one of the primary use cases for the design of the feature.
Here are the general steps.
Configuring a Workflow / Actions
First, export the public key data of the signing certificate to a file
checked into source control. Use rcodesign analyze-certificate and
copy the -----BEGIN PUBLIC KEY---- block to a file in your
repository. e.g. https://github.com/indygreg/apple-platform-rs/blob/main/ci/developer-id-application.pem
defines the Developer ID Application public key data for the maintainer
of this project.
Note
The public key data is included in the code signatures embedded in signed artifacts so there is generally not a concern with making the public key data widely available in the repository.
Next, create a GitHub workflow or action that invokes rcodesign sign.
The indygreg/apple-code-sign-action
action provides a turnkey way to do this. But implementing this action yourself isn’t
too much work either! See
https://github.com/indygreg/apple-platform-rs/blob/main/.github/workflows/sign-apple-exe.yml
for an example of such a workflow. ()This particular workflow is using
on.workflow_dispatch so the workflow is only triggered manually. See
the workflow_dispatch documentation
and Manually running a workflow
docs for more.)
Important
A manually triggered workflow is strongly recommended because a signer must take manual action to perform remote signing and an automated trigger will likely hang unless a person is around to attend to it.
Important
For security reasons, you should set timeout-minutes on either the job
or step initiating remote signing to limit how long a signer will wait.
The important steps in a remote signing action/workflow are:
Securely obtain
rcodesign. We recommend downloading a release artifact from https://github.com/indygreg/apple-platform-rs/releases and pinning/verifying the SHA-256 digest on download.Download the artifact you want signed. The Download workflow artifact action can be useful for downloading artifacts from other workflows in the current repository (since the official
download-artifactaction limits you to artifacts in the current workflow).Invoke
rcodesign sign --remote-signer --remote-public-key-pem-file path/to/public_key.pem.Do something with the signed result (like upload it as an artifact).
Running the Workflow / Action
Now that you have a GitHub workflow or action in place, here’s how you use it.
If you followed the recommendations from above, the workflow is manually
triggered via on.workflow_dispatch. You can trigger the workflow via
the GitHub web UI or via API. For API, the path of least resistance is likely
the gh GitHub CLI tool. e.g.:
gh workflow run sign-apple-exe.yml \
  --ref ci-main \
  -f workflow=rcodesign.yml \
  -f run_id=2214520041 \
  -f artifact=exe-rcodesign-macos-universal \
  -f exe_name=rcodesign
If your workflow is highly parameterized (like this one), you may want to script its invocation to make it more turnkey.
When rcodesign sign --remote-signer runs in GitHub Actions, it will print
instructions on how to join the signing session. You will need to follow
these instructions in a timely manner to complete the code signing operation.
Here is what you are looking for in the job output:
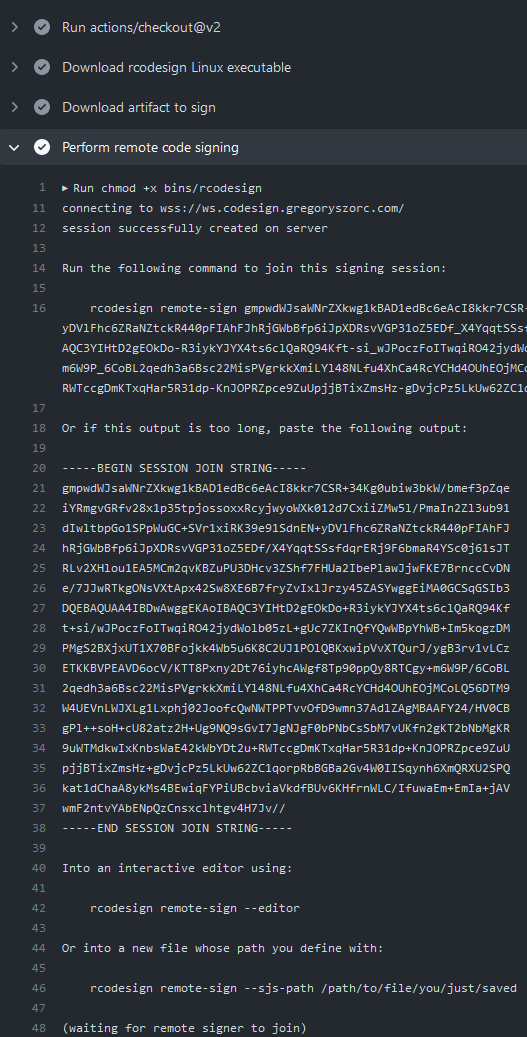
Then, simply follow instructions on the machine with the signing key to commence signing!
Important
When you view the logs of a running GitHub Actions job, only the output from after the point you started viewing them is visible. This means that if you are too late you may not see the printed instructions for joining the signing session!
There are definitely some mitigations we can take for this. For the moment,
you need to be quick to open the job output in your browser. Or you can do
things like add a sleep before running rcodesign sign.
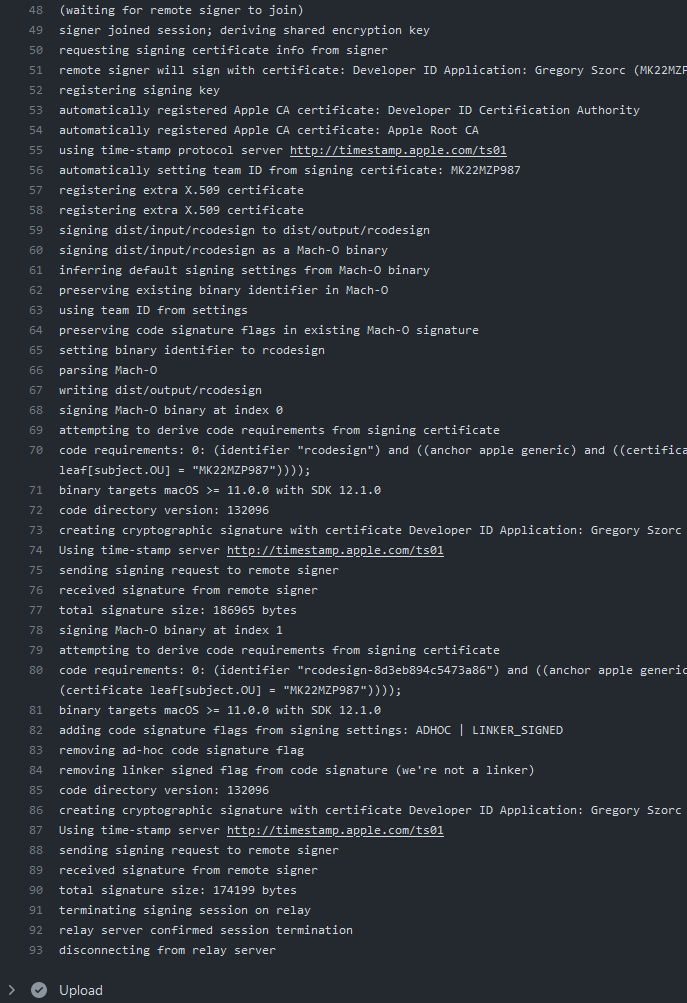
If all goes according to plan, you should see progress being printed both in the signing process and from the near real time output from GitHub Actions.
Here is the output from the GitHub Actions (Linux) machine:
And from the signing Windows machine using a YubiKey for signing:
